Edit loop simulation of structure


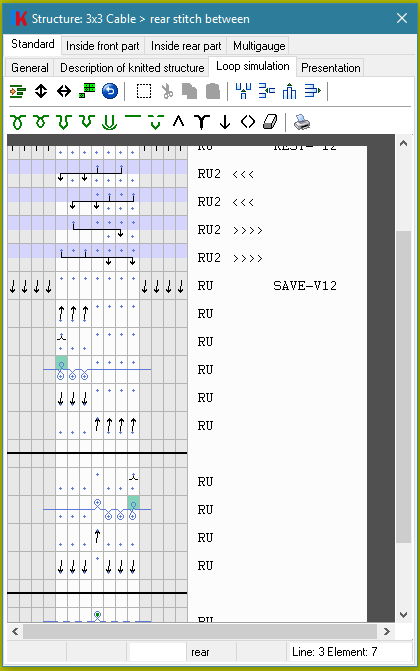
Each line represents a knitting element;
All elements between two thick lines are a knitting phase;
One knitting phase is also one line in the levels.
mirroring front rearClick on Icon with  and all elements in the structure changes their selections from front to rear and rear to front. Also the rack will change.
mirroring left rightClick on Icon with and all elements in the structure changes their selections from left to right and right to left. Also the rack will change.
change to 1x1Click on Icon with and
the function helps to change normal structure to a full garnment structure
undoClick on Icon with and the undo function change the structure to the last version;
mark, cut, copy and pasteClick on mark-Icon with , then move to the first element,
to select the beginning position;All elements inside the marked area are selected.
Click on cut-Icon with , to copy the elements to the clipboard and delete the elements in the structure or
Click on copy-Icon with , to copy the elements to the clipboard,
Click on paste-Icon with , then move to the element after this the clipboard should be inserted,
insert columnsClick on Icon with , then move to an element,
to select the beginning position;In all elements of the structure a copy of the marked needles are inserted.
insert rowsClick on Icon with , then move to an element,
: to select the beginning position;On the top of the lowest marked element, new elements with the same parameters but without any selection are inserted
 :
:Click to an element where an element should inserted
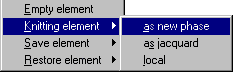
A Popup-menu appears on the screen:
The element takes over the rack of the selected element;
with a transfer-element and a knit-element;
The element becomes a new yarn-feeder;
Generates automatically a needle development;
The element takes over the rack of the selected element;
If the selected element is also an save-element the selection changes to 1x1
The element takes over the rack of the selected element;
If the selected element is also an restore-element the selection changes to 1x1
delete columnsClick on Icon with , then move to an element,
to select the beginning position;In all elements of the structure the marked needles are deleted.
delete rowsClick on Icon with , then move to an element,
to select the beginning position;All marked elements of the structure are deleted.
stitch and tuckClick on Icon with , then move to an element,
to select the beginning position;In all knitting-elements of the structure the marked needles became the new stitch.
the marked needles became the new stitch
Insert between the selected and the next element a new Phase
with a transfer-element and a knit-element;
to select the beginning position;In all knitting-elements of the structure inside the marked area the needles are deleted.
splittingClick on Icon with , then move to an element,
to select the beginning position;In all knitting-elements of the structure the marked needles became split-stitch.
to select the beginning position;In all knitting-elements of the structure inside the marked area the needles are deleted.
no knittingClick on Icon with , then move to an element,
to select the beginning position;In all knitting-elements of the structure the marked needles became no knit.
selection variableClick on Icon with , then move to an element,
to select the beginning position;In all knitting-elements of the structure the marked needles became variable selection.
delayed knitting and press offClick on Icon with , then move to an element,
to select the beginning position;In all delayed knitting-or press off-elements of the structure the marked needles became delayed knitting or press off.
the marked needles became the new stitch
Insert between the selected and the next element a new delayed knitting and press off element
to select the beginning position;In all press off or delayed knitting-elements of the structure inside the marked area the needles are deleted.
transferClick on Icon with , then move to an element,
to select the beginning position;In all transfer-elements of the structure the marked needles became transfer.
a transfer rear to front element on the rear needle bed
the marked needles became the transfer
Insert between the selected and the next element a new transfer element
to select the beginning position;In all transfer-elements of the structure inside the marked area the transfers are deleted.
rackClick on Icon with , then move to an element,
or to select the beginning position;In all elements of the structure the rack is changed.
delete selectionClick on Icon with , then move to an element,
to select the beginning position;In all elements of the structure the needles inside the marked area are deleted.
$IKON=VAR; =Size of Icon in Structure-Level is variable;
(Icon's have been only one Symbol!)
$IKON=VAR-HOR; =Only the Icon-width is variable;
$IKON=VAR-VER;=Only Icon-height is variable;
$YC=HPGL; { HPGL,HPML,HPGR,HPMR,KPGL,KPGR,KPML,KPMR,INEL....}= To give those parameter in function-set is not necessary
$INFUNSET=',PL1,';= The string will be copied into Function set
,Y#1 = work with Yarn feeder
(#1,#2...from Ctrl.Yc-Level right Control-Columns)
,Y#1(XX.) Control-Control internal of the needle-orientation 'NE[]';
,Y#1(III) Yarn feeder-Control goes to Intarsia-fields;
Needle-Selection-Commands:
[.] = Needle doesn’t work
[U] = Transfer
[u] = Split SES <= E5
[N] = Receive (not necessary)
[Z] = Needle-Long-Stitch-Selection
[S] = Needle-Stitch-Selection
[D] = Needle-Long-Tuck-Selection
[T] = Needle-Tuck-Selection
[s] = Needle-Stitch-Selection short (tight)
[t] = Needle-Tuck-Selection short (tight)
[V] = Use for More-Way-Technology
([....-
VVVV],F_SC1,F_TC2;);
,>>> = Main-Rack ( in this case:
!back-needle bed! 3 needles to right;
also '3>' possible )
,SAVE-... = save Stitches in neighbourhood before Rack-Transfer
,REST-... = restore saved Stitches after Rack-Transfer
^13 = first, third ... transfer Needle from front to back
^24 = second, fourth ... transfer Needle from front to back
^ = Transfer Needle from front to back
V = transfer Needle from back to front